Friday, March 29, 2013

Treasure In The Woods

This past weekend, DH spent quite a few hours out in the woods.  There were a lot of blown-down trees from this past winter, including a group of about six that were hung up in a big tangle, criss-crossed together and resting on a couple smaller trees that were bent nearly double but not broken off.

On Sunday, I went out and helped him cut and stack for about three and a half hours, and we worked on that big tangle, getting it about 80 percent down and cut.  Slight problem when one of the blown over trees, instead of sliding down to the ground as we cut it, tipped up into the air instead, using the live tree it was resting on as a fulcrum.  When that happened, we could no longer reach the trunk of the blow down--it was about 12 feet in the air and sitting horizontal!  So we moved on to a different area, and will wait for another good windy day to bring that darn tree down to earth where we can get to it.

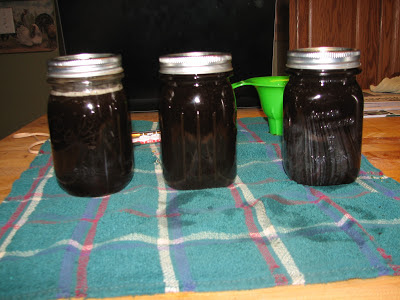
On Saturday, however, I was busy with other things and could not go to the woods.  DH went by himself that day.  When he came in for dinner, he brought me a surprise.  He had found an old canning jar out there near one of the trees he was cutting up.  It's rather an unusual jar, not a pint, and not exactly a quart.  I measured water into it, and it holds about 3 1/2 cups. Tall and skinny, no markings on the sides.  On the bottom, however, I was able to barely make out a symbol I recognized--a capital letter H with an anchor over it.  Anchor Hocking!  It also has four digits, a hyphen, and the letter "A" on the bottom.  Unfortunately, I can't quite tell what the digits are.  3-something (6?  8?)-3-another something.

Anyway, I scrubbed it up and took a picture of it.


Then I put a vintage pint sized canning jar next to it for reference, and took another picture.


Then I did some Googling.  What I managed to find out is that the anchor-over-H logo was used between 1937 and 1968.  So my 'treasure' is a minimum of 45 years old, possibly 76 years old.  How cool is that?


Tuesday, March 26, 2013

Squash Recipe #10 Creamy Butternut Squash Casserole

It's been a long time since I've posted a new squash recipe.  We haven't run out of squash yet, just ran short on ambition and went back to our few tried and true favorite methods of cooking it.  Except for our Super Bowl feast; we made squash "fries" to go along with our BBQ ribs and hot wings, lol.

Last Thursday, however, was DD2's end of the season cheer banquet.  The boys' basketball teams and the cheerleaders and their families got together for a potluck and season highlights.  Which meant I needed a dish to pass. Knowing that nearly everyone would be bringing either meatballs, some sort of pasta (including salads) or desserts, I wanted something different for my contribution. After all, who wants to eat 8 meatball dishes that are basically 3 different flavors, mac & cheese, Greek pasta salad, and 3 pans of brownies, 4 trays of chocolate chip cookies, and those frosted so-soft-they're-mushy sugar cookies from the grocery store?  Not me.  I like a little variety, not to mention some vegetables.

Ahh, vegetables.  That got me thinking. . . Squash in the basement. . . Need a new squash recipe. . .

Allrecipes.com to the rescue!  Here is the one I settled on:  http://allrecipes.com/Recipe/Creamy-Butternut-Squash-Casserole/Detail.aspx.  Mainly because it sounded good and I had all the ingredients for it all ready.  (I really try to avoid making special trips to the store.)

You can highlight and paste the addy if you want to check it out.  Since I made it exactly as the website had it, I don't feel right typing out the recipe for my blog.  Give all the credit where credit is due.  Instead, I'll give you a review.

It was easy to make, tasted great, and went over well at the banquet.  With the protein from the eggs and the cheese, I would think it would make a nice main dish on a night you feel like going vegetarian.

We do that sometimes: eat vegetarian.  Not vegan, of course, with the eggs and cheese, but vegetarian.  Usually only when DH is traveling, though.  He likes hearty meals, with lots of meat.  This is, however a 'side dish' he will eat.  I might even be able to pass it off as a "light" lunch.


Monday, March 25, 2013

Making Little Bunnies

No, we haven't added meat rabbits to this little place here.  In all honesty, we had rabbits for a brief time, in the beginning.  When it came time to do them in, so they could go on the dinner table, nobody wanted to help me.  And, I confess, I couldn't bring myself to do the deed alone.  It's not like dispatching chickens, where one good whack on the neck with the hatchet takes care of it.  No, dispatching rabbits requires snapping their necks rather than death by decapitation.  And I didn't want to mess up and just hurt them.  So I wimped out, listed them on Craigslist, and gave away a dozen nice rabbits.

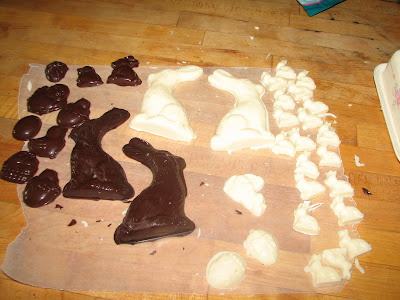
No, these little bunnies I'm making are the chocolate kind, for Easter.  It's a very simple process (much simpler than dispatching real bunnies).

1.  Get ahold of some candy molds.  I found mine at Goodwill.  They can also be purchased online.


2.  Buy some melt and pour chocolates.  Some grocery stores have them, also some of the mega craft stores carry them.  Do an online search and I'm sure you can find somewhere nearby to purchase them.  If not, there's always a website for buying them.

3.  Slowly melt your chocolate either in a double boiler, or in the microwave on 50% power.  Be very careful not to overheat your chocolate, or they won't set up.  Just heat until you can stir them smooth.  Do not touch the chocolate with your fingers! Number one rule of working with chocolate for making candies:  don't touch it with your skin! As much as you'll be tempted to stick your finger in it and sample it, don't!  The oils from your skin can mess up the chocolate so that it won't firm up in the molds.

white chocolate 'wafers' in the double boiler

heated and stirred just until melted and smooth

4.  Spoon your molten chocolate into your molds.


5.  Tap the mold gently on the counter a few times to work out air bubbles (hopefully there aren't any, but you never know until later, either at the time you unmold the candy, or when you are eating it. At the liquid chocolate stage, it's hard to find those bubbles.)

6.  You can let your chocolate cool either at room temperature, in the fridge, or in the freezer.  I chose to do mine in the freezer (in which case a 'big' bunny like in the picture above takes about 15 minutes to firm up) because I was doing a large batch (7 big bunnies, to be exact, plus several rounds of mini bunnies) and didn't want to take all afternoon.

7.  When your chocolate is completely cooled and firm, turn the mold over and gently tap to remove.  Don't twist the mold or try to push the chocolate out!  You can break your mold this way.  Instead, just kind of hold the mold in both hands and snap your wrists in a downward direction a few times above the counter top if the candy doesn't just fall out when you turn the mold upside down.


There you have it, a litter of little bunnies!

dark chocolate and white chocolate bunnies

milk chocolate bunnies 
(and a few dark chocolate other shapes)

Friday, March 22, 2013

His 'n' Hers Banana Bread

Here's how to jazz up your ordinary banana bread in a way that both the guys in the house and the ladies of the home will enjoy.  Take your basic banana bread recipe (ala Betty Crocker's 40th Anniversary Cookbook--thanks, Betty!)  :

3 ripe (ie. browned) bananas, peeled and mashed (about 1 1/2 cups)
1 1/4 cups sugar
1/2 cup butter
1/2 cup 'buttermilk' (milk soured with 1 1/2 tsp vinegar)
2 eggs
1 tsp vanilla
2 1/2 cups flour
1 tsp baking soda
1tsp salt

Mix your butter and sugar, then add in the eggs.  After the eggs have been stirred in, add the bananas, buttermilk, and vanilla.  Stir well.  Add the flour, baking soda, and salt.  Stir just until dry ingredients are moistened and the only lumps are from the bananas.

Okay, here's where we depart from Betty's recipe and strike out on our own.

Butter/grease the bottoms only of two 8" loaf pans.  Take half of the banana bread batter, and pour it into the first pan.  To this pan, add 1/2 to 3/4 cup chopped walnuts.  Gently stir the nuts into the batter, trying not to get too much batter up the sides of the pan.  

Now, to the remaining batter in the mixing bowl, add in 3/4 to 1 cup chocolate chips.  Stir well.  Pour this batter into the second loaf pan (the still empty one).

Put both pans on the lowest rack of an oven heated to 350 degrees. Bake for 60 minutes.  At the end of an hour, test with a toothpick to see if the bread is done (poke the center of the top of each loaf.  If no batter sticks to the toothpick, the bread is done.)  Most likely, your bread is done.  I've been baking this for almost 20 years and unless my oven is on the fritz, the bread has always been done after an hour.

Take the pans out of the oven, and set on a cooling rack for 10 minutes.  After 10 minutes, loosen the sides of the loaves from the pans with a knife.  Gently turn each pan upside down (support the bread with your hand) to remove loaf from pan.  Set bread, right side up, back on the cooling rack to finish cooling.

There you have it, His 'n' Hers Banana Bread.  Nuts for the guys, chocolate for the gals.  :0)

Thursday, March 21, 2013

Things That Make Me Go "Hmmm": Jelly

The other day I went to the store, and bought jelly.  And at this very moment, most people reading this blog post are thinking "You're telling us this, why?" because going to the store and buying jelly is a perfectly normal, ordinary thing.  Not something blog worthy.

So let me back up a bit, and explain why my purchasing jelly at the grocery store is notable enough to post about.  Why jelly makes me go "hmmm".

Jelly makes me go "hmmm" because it has been, apparently, too many years since I have bought it.    I can't remember the date of my last jelly purchase, prior to the other day.  I can't even remember if I lived at this little place here when I bought jelly last.  We've lived at this little place here for coming on ten years.

In that time, jelly has changed.  It still looks the same, but when I turned the jar over and read the list of ingredients, I went "hmmm".  Maybe it's because I've been making jelly and jam of various flavors for so many years (at least 14), that the lists I read on the jars boggled my mind.  You see, when I make jelly it has three or four simple ingredients:  fruit, sugar, pectin, and maybe lemon juice to help stabilize color (especially in my strawberry jam).  That's it.  Four simple things.  Short words.  Words that pretty much anyone can read, and visualize what that item is, does, and looks like.

Not so the store jelly.  I was looking for grape jelly, since I was having a Push-Over Mom moment and actually buying some for DD1, who insisted it's her favorite and that she hasn't had it in forever because, well because I never buy it and I haven't had enough grapes yet to make it from scratch.  She laid the guilt trip on me that she has only had grape jelly at other people's houses in the last ten years.

I confess, grape is not my favorite.  When I was a kid, every pb & j sandwich my mom made, was with grape jelly.  As a mom myself, and a mom who makes jam and jelly, why would I go buy grape when I have in my cellar, made by myself (and a lot of the time, grown by myself) strawberry jam, blackberry jam, black cherry jam (sweet), tart cherry jam (like eating a sandwich with cherry pie slathered on it), peach jam, blueberry jam, apple jelly, dandelion jelly. . . See where I'm coming from???

So, anyway, I fell for her sob story, hook, line and sinker.  On my next grocery shopping trip, I actually went down the jelly aisle.  I actually grabbed a jar of grape jelly. Then I turned it over and read:

Concord grapes, corn syrup, high fructose corn syrup, fruit pectin, citric acid, sodium citrate.

Hmmm.

I picked up a jar of another brand of grape jelly.  And found concord grape juice, high fructose corn syrup, corn syrup, fruit pectin, citric acid and sodium citrate.

Hmmm.

A third jar of grape jelly, store brand.  Exactly the same ingredients as the second jar.

Hmmm.

Was it impossible to buy jelly without that darn high fructose corn syrup?  (I could do an entire website devoted to my disgust with how prevalent high fructose corn syrup is.  It is on my 'not a food' list; it gives me migraines and is one of those dreaded artificial sweeteners that used to send DS2 into asthma attacks before I learned to scan labels for it.)

Desperate, my eyes fell on a jar of "natural" concord grape spread.  Not jelly, mind you, but "spread".  What the difference is, I have no idea.  It, however, does not contain high fructose corn syrup.  Says so right on the label, in big letters, just as big as the ones that say "spread". On the back, where the ingredients are listed, I find:  concord grapes, sugar, fruit pectin, citric acid and sodium citrate.

Phew.  I still don't understand the sodium citrate, as sodium indicates a type of salt, and no jelly I've ever made has called for salt, but oh well.  It's grape jelly, made with real grapes, and real sugar.  Winner, winner, chicken dinner! I'm taking it home!

It also cost about a dollar more than the same size jars of grape jelly made with high fructose corn syrup.  Hmmm.  I need to plant more grapes.


(bonus points to anyone who was of high school or college age in the early 1990's who went to youtube and looked up C&C Music Factory.  Things that make you go hmmm.  Ahh, memories, LOL)

Wednesday, March 20, 2013

How It Started

This homesteading thing, that is.

It was in me all along, I think.  Being outside, just observing nature, getting dirty, that was what I liked.  I can't say how many bees I stepped on--and consequently got stung by--growing up (running barefoot), or how many hours I spent crouched next to an ant hill watching the little worker ants bringing grains of soil up out of their tunnels, or how I managed to read a book while 20 foot up a tree that was swaying in the wind.  But that was what I liked.  Not tv, not being indoors, not necessarily being around people, but being outside in all kinds of weather.

My career goals weren't quite in line with the 'girls can do anything' mantra that was repeated to me by my mother and my female teachers; that generation who had fought to liberate us females from the drudgery of a lifetime of changing diapers, cooking, housework.  They were thinking corporate climber, doctor, politician, scientist, astronaut, nobel peace prize winner.  What I filled out the career interest category on my high school aptitude tests with  was "Farmer". Definitely not the high-powered career I had always been encouraged toward.  I wrote "Farmer" because being a wife, a mom and self-employed while living on a farm (my three goals in life) was not listed in the career options.  I was pretty good with academics (had been in the Gifted & Talented Program until budget cuts did away with it in middle school) and my aptitude tests came back suggesting I should go into environmental engineering, or accounting, or veterinary medicine, because, according to the experts grading the tests, I was "overqualified for farm work".

How ironic that twenty-some years later, the best and brightest young women in our high schools are being encouraged to go into farming, especially the sustainable kind.

I do know when my homesteading endeavors took off though, even if I can't lay my finger on their exact origins.  They took off the day my second child lay in a hospital bed, on oxygen, with a diagnosis of severe asthma.  That day, I was told losing that particular child to an early death was not out of the realm of possibility.  A very sobering thing to hear.

This poor child had started life just as big and strong and healthy as his elder brother had.  But within six weeks, eczema was making itself known on his body.  Within a few months, he was beginning the worse colic phase I have ever known, in the 21 years before or the 19 years since his infancy.  It lasted well past his first birthday. At six months of age, he had fallen from the top 25 percent of the growth charts to the bottom 25 percent.  He seemed to be barely growing in comparison to how his brother had grown in the first year of life. By nine months, his pediatrician had referred him to a dermatologist, and that dermatologist told me that my little boy had "the worst eczema I've ever seen.  Your son will most likely never have normal skin."  Crushing news for a mother.  He had ointments that contained steroids, and tar, and when those failed to clear up his eczema flare ups, the dermatologist talked about ultraviolet light treatments.  DH and I refused to subject our infant to what basically was a tanning bed.  If we were supposed to use sunblock on our children to keep them from developing skin cancer in their adulthoods, how in the world could UV treatment be good for such a little guy?

At eighteen months, DS2 started seeing a different dermatologist (we had moved about two hours away, thus needed to find a new skin doctor for him).  This dermatologist was old, he'd been practicing for 35 years by the time DS2 became his patient.  Not only did he have decades of experience, he himself had eczema, and had made it his pet project.  Gone were the strong suggestions of UV treatments.  Gone were the tar ointments.  Instead, this doctor talked about management from the inside: through nutrition, and through avoiding things that could cause eczema flare ups.  I heard, for the first time, about the Feingold diet, and about preservatives in food.  I heard about artificial flavorings, and colorants.  I heard about perfumes and dyes and chemicals in our clothing, toiletries, and environment.

I heard about that stuff, and I did follow a little bit, especially the perfumes and dyes in the things that touched his skin, but I didn't yet make a drastic change in our lifestyle to avoid every one of those irritants.

Then, exactly one day after DS2's fourth birthday (at which point he was not even 3 foot tall--a height DS1 had obtained around his second birthday--and weighed only 30 pounds), he woke up with his first ever asthma attack.  He couldn't get out of bed, couldn't walk, couldn't even talk he was so short of breath. The night before, he'd been his normal cheerful, talkative, active self, enjoying his birthday party with all it's cake and ice cream and presents and relatives.  Now, however, he was pale, with dark rings around his worried eyes, and you could see every bone in his body as he struggled to breathe.

I carried him to the van, rushed the other two kids into it (I was about 2 months pregnant for baby #4--DD2--at the time), and drove to the family doctor.  There, the staff took one look at him and called for an ambulance immediately.  He was started on oxygen, given epinephrine and steroids,and taken to the biggest hospital nearby.

Where he stayed for three days while the hospital staff got his lungs under control, his blood oxygen level back to normal (up from the initial reading of 85% in the ambulance), and DH and I were repeatedly quizzed on his health history and if he'd ever shown any signs of asthma in the past.  Before being released from the hospital, DS2 was referred to an allergist, and an appointment made for extensive allergy testing the following week.  He came home with a nebulizer (we called it his "breathing machine"), an albuterol inhaler, and lots of medications.

That was what really kicked off my homesteading journey.  After the allergy test came back (mild egg allergy, but no other food allergies; extensive 'environmental' allergies like every animal under the sun, molds, mites, dust, pollens, you name it), DS2 was started on allergy shots.  He also in that time frame had another visit with his dermatologist (who had, by then, made alot of progress on keeping DS2's skin under control without strong prescription lotions).  The dermatologist and I talked about the asthma, and the genetic link between eczema and asthma.  Unfortunately soon after that appointment, the dermatologist suffered a stroke and had to retire from practice.  I was on my own in the battle for conquering DS2's eczema, as the replacement dermatologist poo-poo'ed our holistic way of doing things and insisted I return to treating DS2 with steroids and other strong pharmaceutical things.

So, without a mentor to point me in the direction of exploring this asthma/eczema/lifestyle link, I struck out on my own.  I read about asthma.  I read about eczema.  I researched.  I experimented with changes in our home.  Out went not just the dreaded BHT and BHQ that the dermatologist had warned me about, but out also went artificial sweeteners, which I had learned were often a culprit in creating an asthma attack.  DS2 was taught to ask "is it sugar free?" of any treat offered to him by anyone other than me (especially well intentioned grandmothers and school moms who were on the 'healthy and sugar free' bandwagon) and to politely refuse any sweet treat not made with 'real sugar'.  Artificial colors, too were gone.  No more orange, or blue, or green, or red breakfast cereal.  Our breakfast cereal, when I bought it (I no longer do), was beige.  The color of the flours it had been made from.

I cooked even more from scratch.  I started to garden, growing our veggies organically.   Most of our meat by then was raised by Mother-in-Law, or hunted.  When DD2 was old enough to start eating solid foods, her baby food didn't come from the store.  I cooked it.  Pureed venison was one of her first meats.

We banned perfumes and scented lotions from our home entirely, not just from touching DS2's skin.  Scented candles were also banned.  Nothing smelly that wasn't naturally so (like onions and garlic, lol).  The time hallowed household cleaners got chucked in the trash, and in their place, baking soda, vinegar and hot water were installed.

Over time, and with more 'radical weirdo' (for the late 1990's) changes in our home and diet,  DS2 got better.  His asthma never again came up so rapidly that he ended up in the hospital.  In fact, it became confined to just two months of the year: the spring pollen and mold season.  His skin, too, was getting better.  It looked, yes, it looked almost as normal as the skin of our other three children.

Then DH and I noticed that the other kids, too, were looking more healthy.  Not just looking, but were more healthy.  Gone was DS1's yearly bout of bronchitis in the winter.  DD2, our baby, was healthier than any of her siblings had been in their infancy and toddler hood.  In fact, by the time DD2 went to the doctor for her pre-kindergarten physical, the doctor didn't even have her in his computer system anymore because she hadn't had a need to see him (no illnesses) since her last round of selective immunizations before her second birthday.  When flu and strep went through the elementary school, not one of my children had a sick day that year.  Kind of a strange feeling when the only kids in the school with perfect attendance for an entire school year live in your house, and you know you feed them differently than the way their schoolmates are fed.  Strange, but affirmative.


From there on out, DH and I were convinced that simple and homegrown was the way to go.  Since he was busy being the breadwinner, I was elected the homesteader.  And that is how this little place here, really got started.

As for DS2 and his health problems?  At age 7, he won the 50 meter dash for his age group in the school's field day.  At age 10, he began playing soccer, which requires lots of running.  In high school, he not only spent four years on the varsity soccer team, he spent four years running track.  This from a little boy whom DH and I were told had a high probability of not living to adulthood because of the severity of his asthma.  And his eczema?  Well, he gets a little flaky if he doesn't put lotion on every day--regular old colloidal oatmeal lotion, not steroids, no prescriptions.  But other than that, he's a handsome devil whose skin looks just like every other cute college guy's skin.  He is very conscious of what he puts on, and in, his body.  All those environmentally conscious sustainable farming type college girls think he's awesome.  ;0)


Monday, March 18, 2013

A Syrup Oops.

Last week did not go at all the way I wanted it to go.  The turkey fryer was not working properly, and I thought as a back up I might finally cobble together a 'real' evaporator out of cement blocks and disposable foil pans.  Then it occurred to me that DH was not going to want his cinder blocks to have black soot marks on them when he did get around to building something with them. And, the weather wasn't all that conducive to boiling sap outside without getting rained and/or sleeted and/or snowed on.  Which wasn't going to make boiling the water portion out of the sap go any  faster.

So, I didn't scam DH's stash of leftover cinder blocks.  And I didn't boil any sap.

Until Friday evening, when DH "only" worked a 9 hour day and surprised me by taking a look at that malfunctioning turkey fryer.  Within a few minutes, he had it going, blue flames as tall as my sap pot.  We were sugaring off!

Since the sap pot had sat all week, with slightly less than 5 gallons in it, in a garage,I didn't want to add the rest of the sap to it; the sap that hadn't been heated yet.  However,  that almost 5 gallons of sap never rose above refrigerator temperature, so technically was still good and I didn't want to throw it out.  What I decided to do was boil down just that pot as my first batch of the year.

It went well.  Really well.  Whatever DH had done to the turkey fryer, it was heating like it was powered by rocket fuel. Usually I get a boil off rate of one gallon per hour.  So, that five gallons should have taken roughly five hours to evaporate off all the water until only syrup was left.  That day, however, I was getting better than a gallon per hour.

Slightly more than three hours later, it really started to decrease in volume.  I started checking the level every fifteen minutes.  Things were going great.

Until. . . .

I went out to check the sap, and found that it had hit the syruping point and exceeded that temperature.  My syrup was quite dark, and smelled like it was starting to  burn.  Quickly, I grabbed my stirring spoon in one hand and began stirring the syrup while trying frantically to turn off the burner with the other hand.  I was hoping that by stirring it, I could keep the temperature from rising any higher, and losing any usefulness from that batch of sap.  I knew that in order to make maple sugar you heated the sap beyond the syruping point.  However, you have to heat it very carefully, to keep it from burning and the flavor being ruined.  I hadn't heated carefully enough, not with leaving it unattended just as it came to the syruping point.

DH came to my rescue, and carried the pot into the house, while I walked with him, stirring like mad all the while.  As the temperature quickly dropped (ambient temperature in the garage was forty-ish), the syrup began to thicken and crystallize in the pot.

In the house, I grabbed a 2 cup glass bowl and poured the syrup into that.  It was my hope that I would have something useable once the syrup cooled.

I let the syrup sit, uncovered, all night.  The next morning, the top was hardened, and the sugar crystals visible.  Once that crust was broken by a spoon, there were sludgy crystals underneath, and in the very bottom of the bowl, extremely thick syrup.


The flavor was slightly scorched, but not so much as to be unpalatable.  Rather, it was a roasty flavor, reminiscent of, but not quite like, coffee.  In my opinion, still usable, just not as syrup.

As an experiment, later on Saturday, I scooped out a couple of spoonfuls of the crystallized stuff, and slowly reheated it until the crystals melted.  Then I drizzled it over vanilla ice cream and served that as dessert.  It went over really well. Mental note: one of these days, when I actually get around to making homemade ice cream, try making maple flavored ice cream.

So, one use for my failed syrup had been found.

Getting online, to my favorite homesteading forum, I asked a question of the more experienced syrup makers there.  They responded that they had had similar experiences in their past, and that the substance I had, no longer syrup and not exactly maple sugar (because of it's slightly scorched state and not having been fully taken to the sugar stage), was good for ice cream topping as I had discovered, as well as baking with and flavoring coffee.

DH says I should use it in no-bake cookies rather than the regular sugar the recipe calls for.  I kind of like one of the suggestions I got online, which is to use it in cinnamon rolls.  I don't think I have enough to do both, though.  Perhaps I'll do the no-bake recipe 50/50 maple sugar and regular granulated sugar, and use the rest in cinnamon rolls.  When I do, I'll be sure to give a report on how it worked.  Just in case any readers ever happen to have their own batch of syrup get away from them.  ;0)


Sunday, March 17, 2013

Small Scale Syrup Making

This weekend DH and I finally got our sap boiled down.  Not only did we get about 15 gallons boiled down to almost three pints of yummy syrup, I remembered to take pictures of the process.

Here is the full pot of sap, as it began to heat.  You can see that it pretty much looks like water.


As it boiled down, we added more sap, to keep the pot full.  After about six hours, the last five gallon bucket had been added into the boil pot.  As it boiled, and the hours went by, the sap began to change color.  First getting a little tan, then golden, then amber.  About that time, we were down to only about a gallon and a half in the pot.


Since the batch we'd boiled down the night before (I promise a post about that another day) went wrong right about this point, DH wanted to pull the pot off the turkey fryer and transfer the sap to a pot that could be finished on the stove in the kitchen.

So I got out my two gallon pot, put my handy muslin 'sap filter' over the top (secured with a giant rubber band), and DH poured the sap from the big pot into the smaller one.  Then I took off the filter, and we put it on the cook top to finish off.  I added my candy thermometer in order to keep track of the temperature of the sap from here on out.  Syruping point is seven degrees above boiling point.


The 'turbo' burner on my cook top doesn't compare with the newly improved turkey fryer, and my evaporation rate went way down.  Where I'd been getting quite a bit more than a gallon an hour on the turkey fryer, it took over two hours to get from about a gallon and a half down to three pints, when it actually got to the syruping point.

I sat in the kitchen, babysitting the sap, and I knit.  When I got tired of knitting, I read the farm news.  And when I'd finished the farm news, I surfed the web (I'm contemplating increasing the orchard and was researching the best places to get the varieties I am considering adding).

Finally, I saw the tell tale bubbles that indicated the sap was ready to hit the magic temperature and turn into syrup.  Note how much emptier the pot is at this point.


From those first syrupy bubbles, it quickly became real honest to goodness syrup, indicated by the golden foam that rose up the sides of the pot.


I removed the pot from the cook top.  It was time to can the syrup.  I had clean canning jars waiting in a sinkful of hot water, keeping them warm so that there was no chance of the jars breaking when I ladled in the hot syrup.


All in all, it took about ten and a half hours to go from fifteen gallons of cold sap, to three pints of finished maple syrup.


Tuesday, March 12, 2013

Plan B (or is it C?)

Yesterday I started to boil off sap with the turkey fryer.  Only, I couldn't get the flame quite right.  Oh, I got orange flame right up the sides of my 5 gallon pot all the way to the rim, but I couldn't get a blue flame.

Orange flame just ain't gonna get sap boiled.  It's gotta be blue.

Then, DH comes home from work (9.5 hours yesterday--I started keeping a log last Monday, as it seems to me in the last year he has put in more than 40 hours a week every darn week, with 50 being the 'usual' anymore.  Last week:  54.5 hours in 5 days.  A rant about what a slave-maker salaried positions can be might be in the future of this blog. . .).  He takes one look at my lovely useless orange flame and says:  "That's not working right.  Didn't I tell you?"

Argh!  No, he had not told me, last Fall when he last brewed beer with the turkey fryer, that it wasn't working correctly.  A fine thing to find out now, when I have 20 gallons of sap on hand to boil, and another 5-7 gallons hanging on trees out in the woods!!  Why oh why could I not have found this out six months ago, when I would have had time to repair or procure at an affordable cost, another burner for the turkey fryer?!?  (Have I mentioned yet that I'm not liking how busy DH's job has kept him for the last twelve months or more?  Even when he's home, his head is at work. . .)

Okay, calm down.  Deep breaths.  Don't look at all that sap sitting waiting to be boiled.  Don't think about what a great run there should be this week (two days near freezing followed by five more in the 40's is the forecast).  Think.  Think.  Think.

What can I heat my sap with?  What do I have on hand that I can do a little redneck engineering on?

Well, I do have all those concrete blocks I had wanted to build my evaporator with for this year's sugaring off.  But I don't have a sap pan or pans to use with them.  Hmmm.  Think.  Think.  Google an idea.  Yes!  It appears it is possible.

You see, I have at least a dozen giant foil pans 4" deep (or more, I'll have to go measure them) that Mother-in-Law gave me eons ago and all I've found to do with them is make Chex mix at Christmas time.  Which only requires one pan.  The other use has been to start seeds (in yogurt containers or peat pellets) in three to four more of them each Spring. The rest have been sitting on top of the upright freezer in the basement for at least half a decade.

Apparently, disposable foil pans can be used as sap pans, over an open fire, on an evaporator.  Now I have blocks, pans, and lots of firewood.

Tomorrow, I shall put Plan B into action.  Or is it Plan C, since Plan A was originally to build an evaporator, and then that plan was scrapped for using the turkey fryer, which would make the turkey fryer Plan B?  Or is this Plan A 2.0?

Whatever.  It's what I'm going with.  I'll let you know soon how it works out.

(BTW, it has now been a full 9 hour work day for DH today, and no call from him yet saying he's on his way home, start cooking dinner.)

Monday, March 11, 2013

Buckets o' Sap

That's what I have right now.  Three 5-gallon buckets full of maple sap.  It's time to boil.  The weather has been consistently about 40 degrees during the day for the last three days straight (today will be #4), the trees are running at about a gallon a day, sap is piling up, and I'm out of containers to store it in.

So, time to start sugaring off.  I had hoped to have an evaporator this year, in order to do the boil more quickly, cheaply (if you ignored the cost of the evaporator pans and parts), and efficiently.  Instead, I once again find myself with 20-lb cylinders of propane, and the turkey fryer.  The best laid plans of mice and men, you know. . .

With this set-up, I can achieve an evaporation rate of about 1 gallon an hour.  Which means my 15 gallons of sap will take me 15 hours to turn into maple syrup.  Roughly 1 quart and 1 pint of syrup.  And tomorrow, by the time the boil off of the first batch is done, I will have 10 more gallons of sap collected, ready to begin the second batch.  Thus, the boiling will continue pretty much daily until the sap flow slows, or the trees bud out.  Whichever comes first, and is largely dependent on weather conditions.  Average sap run is six weeks long.

This afternoon, I got the turkey fryer set up, and the first 5 gallons on to boil.  Which takes halfway to forever to get 5 gallons of cold sap to boil.  So, while it was heating, I gathered my one now-empty bucket, and another food grade bucket I found (and washed/sterilized), and headed to the woods for today's collection.

I had no sooner gotten the tractor into the field, than I realized that the mud at this little place here has progressed past the soft stage, past the slick surface with icy tundra underneath stage, and well into the boot-sucking stage.  So far into the boot-sucking stage that it is just about to the tractor-miring stage.  It was prayers and skillful tractor driving that got me the round trip from barn to woods and back without getting the tractor stuck in the field.  Some skill, lots of prayers.  Mostly prayers, I admit.  Apparently tomorrow's sap collecting will involve carrying buckets by hand and walking on foot to the woods and back.  Nothing like hauling 80 pounds of sap over 250 yards through mud to get your heart pumping and your muscles burning.  That just might count as my workout tomorrow.

I'm planning to take some pictures of the boiling process, but aren't quite far enough yet to get those posted today.  Rather than not post any progress on my sap collection and beginning to sugar off, I decided to do a post today about the collecting, and post tomorrow or the next day with a step-by-step post showing the boiling off and bottling (canning jars, actually.)


The first 24 hours yielded not a lot per jug.  This was one of the fuller ones; in a sunnier location.  Trees in a cooler part of the woods were running much more slowly, with only about an inch of sap in their jugs.


 My sap bucket carrying system.  I utilize the tractor to get the buckets to and from the woods.  In the woods, I stop on the road near each tapped tree, or near a cluster of  tapped trees, and hand carry the bucket to the tree and back to the tractor, then drive around to the next tree or tree group awaiting collection.  This picture was taken on Wednesday, when there was still snow and the ground was still firm.


As a preliminary filter, I use a piece of unbleached muslin over the bucket (usually held on with a very large rubber band--unfortunately mine broke at the first tree and I didn't have a spare in my pocket).  The early sap is pretty much pure, with no bugs or pieces of stuff in it, but as the weather warms, there will be little things that find their way into the jug with the sap.  Hence the need for filtering.


The first sap of the year.  Very clear, looks just like water.  Tastes just like water, only with a hint of sweetness.  I like to taste each tree (the uber scientific way: hang my head under the tap with my mouth open, and let sap drip on my tongue).  I find it interesting how some trees are sweeter than others, even when they appear to be the same variety of maple and are growing within 10-20 feet of each other.


Same jug as in the first picture, this time on Friday.  A full jug in the 24 hour period from collection Thursday to collection on Friday.  This tree gave a full jug on each Saturday and Sunday, then a half-jug on Monday (too warm overnight Sunday to Monday, and temps in the 50's w/cloudy skies and slight wind on Monday.)

As you can see, I don't have a highly technical syrup making system.  Mine is more of the scrape it together and make it work, kind of thing. Perhaps someday I'll have a real set-up.

I have learned some interesting things since I started tapping trees in 2010.  One is that the amount of wind has an adverse affect on the flow of sap.  The calmer the weather, the faster the sap flows.  On windy days, even though temperatures might be right, you just don't get as much sap.

Another thing is that sap changes color (and taste) as the trees bud out.  Right now, during the early run, the sap is clear.  Later in the season, as the buds are more swollen, the sap will gradually turn darker, appearing yellowish.  The syrup also changes color, from golden in the early batches, to deep brown in the final run.

Friday, March 8, 2013

Turkeys, Again!

I was making my bed this morning, when I happened to look out the window (which looks out the back of the house, onto the field and woods).  I saw turkeys!  The same flock that had been in the field earlier this week was back, and they were much closer.  So I raced downstairs for the camera, and slowly cracked open the sliding door in the dining room just far enough to stick the camera out of it.  I was hoping not to spook the turkeys and send them running.  A few did look up at the house, but most were distracted by the noises my chickens were making in the coop and so didn't pay much attention to me.

I started snapping pictures.


the light turkey next to a regular colored turkey

I noticed that the entire flock of 39 is hens.  That's a lot of wild hens running around.  The toms will be in a separate flock somewhere.  In about a month, it will be mating season, and then I'll see them mixed together.  But, for now, it's gender segregation.

While I was taking pictures, the flock got agitated.  They turned, and at first seemed to be moving away from me.  Thinking they had sighted me or heard the click of the camera, I backed out of the doorway.

It was soon apparent that they weren't concerned about me.  They had sighted something over on the septic mound, and they actually moved closer, into the yard.


I didn't have to wait long to figure out what it was they were so interested in seeing.


One of the barn cats must have been hunting mice on the septic mound.  It didn't like the turkeys (they are rather large) being in such close proximity, and the cat tried to slink away unnoticed.  

The turkeys, however, kept tabs on it.  They even followed it, which was entertaining to watch.


 Across the back yard . . .


Through the valley that we refer to as the River (it fills up in the spring with snow melt and rain water, sometimes getting nearly a foot deep and about 4-5 feet wide), which is where the front yard, around the house, and the back yard drain off into the field.


Over toward the barn area . . . 


The cat stopped and said to the turkeys "Back Off!"


But they didn't listen, and followed it behind the wood pile. 


Which gave me a chance to get a better close-up picture of the light colored hen.


The cat finally escaped under the chicken coop, and the turkeys got scared away when DD1 arrived home and drove up to the teenager parking area.


39 turkey hens hightailing it to the woods.


Wednesday, March 6, 2013

We're Not Alone!

Yesterday, while out in the woods tapping trees, I noticed an abundance of animal tracks in the snow.  Quite a few were on the road in the woods.  Which I continually find interesting, as when DH and I decided to build the road, we worried that having a wide path through the woods would be disruptive to the wild things that lived at this little place here before we arrived to take ownership.

On the contrary, they seem to like the road and use it more that we do!  I cannot tell you how many times we see fresh tracks in snow or mud (depending on the time of year), how many hours we've sat hunting and seen animals mosey along the road, enjoying it's unobstructedness rather than go a winding way through briars and underbrush.

I couldn't help but take some pictures yesterday, since I had the camera along with me to document the tree tapping that I was doing.


Turkey tracks


A close up of a turkey track


Deer tracks


Close up of deer track


Perhaps we should call it the 'highway' instead of the 'road'!


Wild turkeys off the road and into the field
(Not sure if the light one is a genetic mutation or a cross with an escaped farm turkey!)


The flock came as a black wave from the woods, then spread out across the field.
I counted 39 turkeys total, not sure if all of them made in it the picture.

Tuesday, March 5, 2013

Tapped!

Today is the day!  Today, I gathered up my tapping supplies and headed out to the woods to tap maple trees for this year's sap run.

I had decided to keep it small, only 10 taps.  That is how many milk jugs I had washed and saved for collecting sap in.  With only four of us at home, and not eating pancakes, french toast, or waffles but maybe once a week, I didn't figure we'd need more than a gallon or two of syrup to get us through until next year.

Then I got to the woods, and sap fever hit!  I discovered that several trees that were too small to tap in 2011 (the last time I made syrup) had grown quite a bit in two years.  I used up 5 of my 10 jugs on 'brand new' trees before I was even half way back into the woods.  At the back of the woods is a pretty good sugar bush (at least, that's what I'm going to refer to it as), with at least ten trees of tapping size; a couple of which are large enough to hold 2-3 taps each.

I ended up only putting two jugs in the rear sugar bush, using up the rest of them in what I shall now refer to as the west sugar bush, near the front half (NW corner) of the woods.

I took the camera along, to document, for your viewing pleasure, the tapping of my trees.


My first candidate.


Sap is definitely running;
it was coming out of the spile
 faster than I could get the spile tapped into the tree.


Collection jug hung,
tied to the spile with a piece of baling twine.
(I found they tend to blow off on windy days
if I don't tie them on.)


Another tree tapped.


Part of the west sugar bush.
How many tapped trees can you find?
(There are four in this picture, look for the white jugs.)


The first jug, as seen less than an hour after hanging it.
All ready nearly an inch of sap collected.


I'm not sure ten taps is going to be enough.  Sap fever is addling my brain, making me forget what a long process boiling off is.  At the moment, all I can think is "Wow, the sap is running great, and today is the first day warm enough to tap!  I wonder how fast it will run later this week, when the temperatures get over forty.  Maybe I should tap ten more trees.  I bet I could sell the extra syrup (under the table of course, supposed to have an approved set up here for sales) to x, y, and z who asked if I had any for sale in 2011. . . "